Applies to use of 1/8″ & 3/16″ wire on #SJ27 series (3/16″) Terminals only (using adapter sleeve for 1/8″ wire).
Tools required for Installation:
- Cable Cutter
- Sharp Knife
- Marking pen or pencil
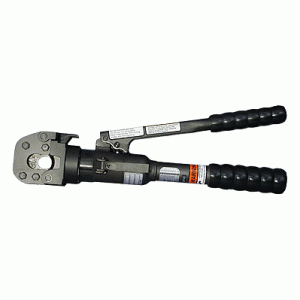
- Johnson Marine Company Bolt Type Tool
- 1/2″ Open End Wrench or Socket Wrench
**Instructions apply to this tool only, FAILURE could result from using other tools
Important: Use only 1/8″ or 3/16″, preformed, corrosion resistant wire in 7×7 construction
- Adjust all turnbuckles & pelican hooks to 2/3 extended.
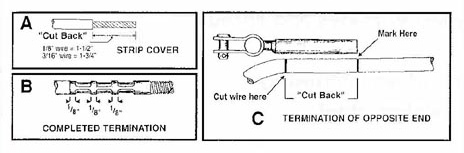
- Strip vinyl cover back to expose 1-13/16″ to expose bare wire.
- Insert terminal into die (marked 3/16″) as shown in (A). Tighten clamping bolts just enough to grip terminal firmly.
- When using 1/8″ wire, insert sleeve (Product # SJ36611) into terminal. 3/16″ wire does not require a sleeve.
- Insert wire into terminal, tighten clamping bolts alternately making sure the vinyl cover stays tight against terminal.
- Tighten bolts alternately until die blocks are fully closed and no space can be seen between them.
- Loosen bolts until terminal can be repositioned for next crimp.
- Position terminal as seen in (B) & repeat steps 6 & 7 until a total of 5 crimps have been completed. Terminal should appear as shown in (C).
- Attach completed terminal at required position and lead wire through stanchion eyes. Attach next terminal to be crimped at required position and while holding wire taut, mark wire as shown in (D).
- Repeat steps 2 through 8.
*Hand crimp terminals when properly applied will withstand pullout strains of 65 – 70% of 7×7 wire strength. We do not warrant use of these terminals for standing rigging or other high load applications.